How to Get a Fever Down in a Toddler or Child

When a child has a fever, it can be a worrying time for parents. A fever is a common symptom of many different types of illnesses, and it is usually a sign that the body is fighting off an infection. While a fever is not always a cause for concern, it is important to monitor a child's fever and take action if necessary to bring it down. Here are some tips on how to bring a fever down in an infant or child:

1.      Offer plenty of fluids: It is important to keep your child hydrated when they have a fever. Offer them plenty of fluids, such as water, broth, and sports drinks, to help replace the fluids lost due to fever and sweating.

2.      Use over-the-counter pain relievers: You can give your child over-the-counter pain relievers, such as acetaminophen (Tylenol) or ibuprofen (Advil), to help reduce fever and relieve body aches. Be sure to follow the dosage instructions on the package carefully.

3.      Dress your child in lightweight clothing: Overdressing a child with a fever can cause their body temperature to rise even further. Dress your child in lightweight, breathable clothing to help regulate their body temperature.

4.      Keep the room temperature cool: A cool room can help lower your child's body temperature. Keep the room well-ventilated and set the thermostat to a comfortable temperature.

5.      Use a fever-reducing bath: A lukewarm bath can help bring down a fever. Be sure to use lukewarm water, as hot water can make a fever worse. You can also add a few drops of essential oils, such as peppermint or eucalyptus, to the bath to help soothe your child's symptoms.

6.      Use a cool compress: A cool compress can help bring down a fever and reduce inflammation. Soak a washcloth in cool water and place it on your child's forehead, neck, or chest for a few minutes at a time.

7.      Encourage rest: Encourage your child to rest and sleep as much as possible. This will help their body fight off the infection and recover more quickly.

8.      Consult a healthcare professional: If your child's fever is high or persists for more than a few days, or if they are experiencing other severe symptoms, it is important to consult a healthcare professional. They may recommend additional treatment or medication to help bring down the fever and alleviate other symptoms.

It is important to note that fever is a normal and necessary response to illness. It helps the body fight off infection and can be a useful tool in the body's immune system. In most cases, a fever will resolve on its own without treatment. However, if your child's fever is causing discomfort or is accompanied by other severe symptoms, it is important to take action to bring it down and seek medical attention if necessary.

It is also important to be aware of the signs of a fever that requires immediate medical attention. These can include a fever that is higher than 104°F (40°C) in infants under 3 months old, a fever that persists for more than a few days, or a fever accompanied by other severe symptoms, such as difficulty breathing, severe abdominal pain, or a rash. If you notice any of these signs, it is important to seek medical attention immediately.

In conclusion, a fever is a common symptom of many different types of illnesses in children, and it is usually a sign that the body is fighting off an infection. While a fever is not always a cause for concern, it is important to monitor a child's fever and take action if necessary to bring it down

The Ultimate Hospital Bag Checklist

(This post contains some affiliate links, which means when you purchase an item I may receive a small commission – but I only make referrals for items I love or companies that I know offer great services and deals.)

Congratulations! You are about to give birth. :) As you are getting ready to go into labor you may be wondering “What do I bring with me to the hospital?” or “What do I need in the delivery room?” (Especially if you are a first-time Mom). With my first baby, I ended up in the hospital for about a week due to pregnancy complications, so there were things that I brought that made my life easier. Subsequently, I have had three kids (my littlest is one) and these are the items that I bring to the hospital every time. 😊

A Suitcase with Wheels – This is helpful because when you are checking out of the hospital you will have a lot of things to manage, having a suitcase with wheels helped us a lot. We saw a lot of other couples with several items in duffle bags, grocery bags, pillows under their arms, etc. and all of that could easily fit in a suitcase with wheels. It just made things easier for us. We have one similar to this one:

Fluffy Robe – Hospitals are cold places and I was so thankful to have my fluffy robe. Several nurses have come into my room and told me I am smart for bringing it. The hospital has thin sheets but if you are somebody who gets cold easily you will be so grateful for a warm robe.  If you want something lightweight these lightweight waffle spa robes are nice to have, too.

Hair Ties – This is a must-have; it helps to keep the hair out of your eyes for labor and delivery. I love these velvet scrunchies because they don’t pull on your hair as much.

Socks with Grips – Ideally at least 4-5 pairs you would be OK with tossing afterwards. I’m just saying…

A Large Cup for Water with a Lid - You will be going through a lot of water and this saves trips down the hall to fill up. :) This one is 30 ounces and has a straw and a lid and is very affordable.

Snacks for Dad and Food for You After Labor (Usually you can’t eat when you are in active labor, but it’s nice to have something for after you give birth, and sometimes the hospital cafeteria is not open at 3:00 AM or whenever you finish delivering and you are hungry. The hospital sometimes has some cold sandwiches in the fridge but that’s not guaranteed and is dependent on the hospital).

Comfortable pillow or a Travel Pillow – I like having my own pillow when I go places, so this was a must have for me. At the hospital I went to, the pillows at the hospital were disposable so they were not the best quality…

Car Seat – If you make sure it is installed ahead of time it makes things easy for when it’s time to leave the hospital, normally they do not let you leave the hospital without making sure it is installed correctly. Here are a few different options.

Microfiber Blanket – This was one of my favorite items that I brought, it is so nice to have. The sheets were super thin at the hospital so it was nice to bundle up in this.

Toiletries (Toothbrush, Toothpaste, Deodorant, Lotion, Shampoo, Conditioner) Some hospitals provide these items but many do not. It’s also nice to have your own items that you are familiar with the quality and brand – having your favorite body wash and shampoo helps make you feel more like yourself after you give birth. Labor and Delivery can be exhausting.

Phone, Charger and Extension Cord – the first two are self-explanatory, but the extension cord is nice because sometimes you are not near an outlet.

Makeup – For after-birth photos

Mints / Gum – For you and/or your husband

(If you have one) a Retainer or Mouthguard – With my first I hurt my teeth clenching down so hard, the second two deliveries went much better because I brought a mouthguard.

Camera / Phone for Taking Pictures – You can take some very good photos with your phone and that would be all you would need, but some people like to take photos with a higher quality, if that’s what you want this is an entry level Canon DSLR that takes really nice pictures.

Baby Blanket – The nurses used one of my microfiber blankets to keep the baby warm when he was in the bilirubin light machine, they loved how soft mine were.

Comfy Clothing (Large Pants, Easy to Open in the Front Shirts, Dresses, etc.)

Clothing for Dad

Small Fan (if you run hot this is nice to have)

Nursing Bra + Breast Pads + Lanolin Cream (If applicable)

Nursing Pillow (if applicable)

Laptop/Tablet: In case you want to watch movies or listen to music while you are waiting for things to ramp up (it can take several hours if you are being induced, with one of my kids I checked into the hospital at 8:30 AM for inducement and delivered at around 1:30 AM).

Cute Clothes for Hospital Pictures (for you, baby’s father and the baby)

Diapers, Wipes and Diaper RashCream (possibly) – The hospital may provide these, mine did. But you will need them for after you come home. My favorite Diaper Rash Cremes are Aquifer and Boudreaux’s Baby Butt Cream. One is petroleum based and one is zinc oxide based, if one does not work on the rash the other one usually does.

After Delivery:

After your labor, the hospital will provide you with pads, a perinatal bottle, pain killers, etc. But these were items that I realized I needed after giving birth:

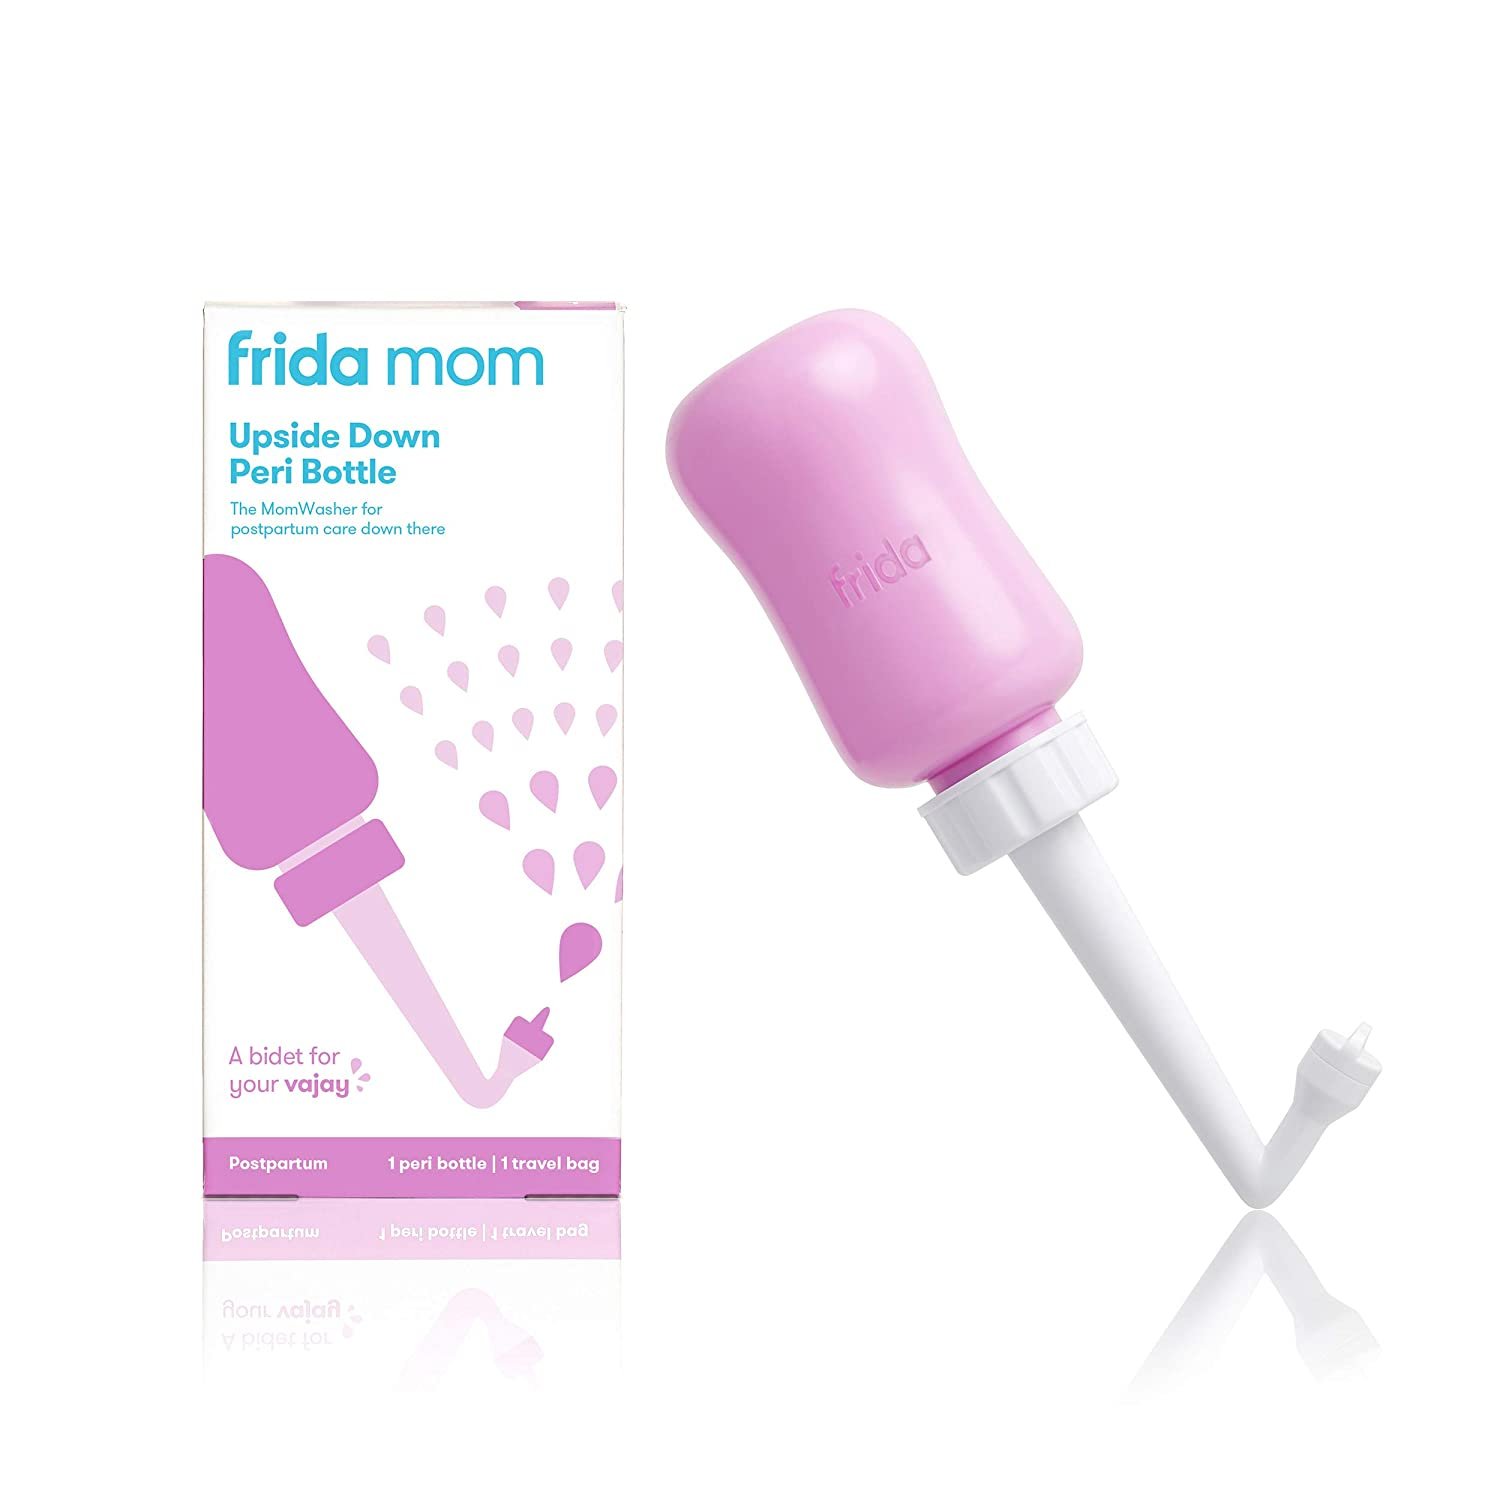
Perinatal bottle: Frida Mom Upside Down Peri Bottle (the one they provide you is OK, but it is cheaply made and it doesn’t clean out down there as well as THIS ONE does. It feels amazing (with warm water) and helps to more effectively dissolve your stitches than the other one you get - trust me on this one. I loved mine.

Adorable Baby Clothes for Coming Home

Large Granny Panties OR Adult Diapers – Don’t laugh at the adult diapers, these are really nice for postpartum. It’s nice throwing them away and they provide better coverage than those pads which can move in the middle of the night… if the pads move you will be throwing your underwear away and possibly staining your sheets and bedspread. My first I refused to buy adult diapers, but my second two I did and it was so nice not to ruin my clothes and just be able to toss them.

Nose Frida / Syringe Bulb and a Humidifier - Something I did not initially realize is newborns very easily get congested. A humidifier really helps with the congestion, and a Nose Frida helps to clear their airways. If you are going to go with a syringe bulb you should consider getting one like this one that can be taken apart and cleaned out, it’s much more sanitary.

Anyways, I hope this list helped! You’ve got this 😊 Wishing you a happy, safe and magical delivery.

Take care,

Charlotte

Discipline Methods for Reeling in an Unruly Child

Do you need some advice on various discipline methods? Sometimes our current methods do not cut it, and it can seem like nothing is helping. We polled various mothers to see what punishment methods work best for them and compiled them for you below. Hopefully one of these methods will work for you! When punishing, remember every child is different and what works for one may not work for another. Just try to be patient, and trial and error until you find what works.
Be consistent with whatever you do, caving in will only give them power. Make sure to remind them lovingly but sternly that you are the parent. (Additionally, please use your discretion before applying any of these methods, as each child is different and responds differently to various punishment methods):

·         Positive reinforcement and praise

·         Praise a sibling for behaving in a way that you would like the disobedient child to behave

·         Provide child with special treats if they behave the way they should each week

·         Time outs – a good rule of thumb is 1 minute per age. After the time out, it is helpful to discuss why they were placed in time out and hug it out afterwards.

·         Take toys away

·         Sit down with the child, talk calmly and empathize with them or take them away from the frustrating situation and hold them and calm them down.

·         Ignore tantrums

·         Provide positive and negative consequences for their behavior (do good, receive reward, do bad, face the consequences for your actions).

·         Correct them and redirect them, if they are young

·         Corporal punishment (spanking, pinching, etc.)

Ideas to Get Your Toddler to Stop Using a Pacifier

Some children couldn’t care less about using a pacifier, and others are absolutely obsessed. Eventually, many children make the transition to give up their binky on their own, but for the stubborn remaining few, here are a few tips to get your toddler to give up their pacifier:

Gradually Take it Away

If your little one uses their pacifier all the time, start to gradually limit the amount of time that they use it. Take it away in the morning, then eventually during the day, then allow them to use it only at bedtime, then phase out the pacifier completely. It helps if you have them voluntarily give it up, so they feel ownership over the decision to stop using their pacifier.

how+to+get+toddler+to+stop+using+paci.jpg

 “Break” the Pacifiers

Part of the pacifier’s allure is that it allows them to suck it and the sucking motion soothes them. If you poke a hole at the end of it or snip the ends off them, it removes the pleasure of sucking the paci, because it will then “give” a little while they suck it. They may decide to toss the pacifier on their own at that point.

Have Them Throw it Away

If you feel that your toddler is willing, you may be able to convince them to help you throw them away. Not many toddlers would be a good candidate for this strategy, but it is worth a shot.

Buy Them Something They Want and Use the Pacifier as “Money”

how+to+get+toddler+to+stop+using+a+pacifier.jpg

Is there something that you know that your little one would want, and would be willing to give his / her pacifier up for it? This is the route to go. Tell your tot that to receive the new item, they will need to “pay” for the item with their pacifier. Some toddlers will wholeheartedly trade their pacie’s for the new item.

Have Them Give it Away to Babies in Need

Some toddlers are very aware of other babies out there, and empathetic to their needs.

Have your little one “mail it” to the hospital for new babies. They can assist with decorating the envelope and sealing it, and if they ask about their binkies let them know that the new babies need it more and appreciate their donating it to them. Of course, if it were me I would actually give it to a friend / family member with a new baby (but explain the situation to them and let them know that if they would like to toss the binkies after we leave that is fine with me).

Gift it to the Binky Fairy/Santa/Tooth Fairy

If you are a family that believes in Santa Clause, you may want to tell them that if they give the binky to Santa, they will get a big boy/girl gift in return. Or, you can have them tie the pacifiers to balloons and release them into the air for the Binky Fairy. Or, you could let them know that binkies are not good for growing teeth, and have them leave the binky under their pillow for the tooth fairy.

Pacifier Fairy Book

I have heard some good things about “The Paci Fairy” book, but there are a few others you could check out (“Goodbye Binky”, “Florrie the Paci Fairy”). These stories help your little one to feel involved in the story, and release their binkies voluntarily.

Build a Bear

This idea is one of my favorites – take your little one to Build a Bear Workshop and have them stuff their pacifier in the bear’s tummy, before it is stitched up (this way it is with them, but not in their mouth).

Cold Turkey

If you have tried the above methods and none of them work, you could always go cold turkey. I don’t like this method, because it can cause lots of tears and toddler meltdowns; but eventually they will need to learn to let go and some children do better with a “ripping off the band aid” approach.

Hope these ideas helped!

XOXO

Charlotte

How to Fix Your Newborn’s Sleep Schedule

Sleepy parents of newborns all tend to have the same question: How do I get my newborn to sleep at night? Studies show that newborns, on average, sleep 15-17 hours in a 24-hour period, but it can be frustrating when all of their hours spent asleep seem to be when you want to go to bed!

So, how do you get your little one to sleep at night? The key is to keep them awake during a larger portion of the day. Here are a few tricks that work to keep your little ones asleep at night:

Rule Out GERD

get+baby+to+sleep.jpg

Some babies have GERD, which means that after they eat their stomach acid comes up their esophagus and wakes them up. These babies do best by going on medication for GERD and by sleeping on an incline (a rock and play worked best for our family).

Give them a Bath

Baths help little ones to relax and wind down before they fall asleep for the night. They also tend to tire newborns out, so they do not have the energy to fuss at night. As your newborn grows older, they are an important part of the bedtime routine.

Don’t Bundle Them Up

Because newborns are so tiny and do not have a large amount of fat reserves, new parents bundle them up. The more bundled up they are, the more likely they are to be sleepy. Strip of a few of the layers and see if this helps your little one be more alert during the day (of course, monitor them to make sure they are not too cold).

Strip Them Down and Bring Them Outside

Babies have a circadian rhythm (which is the scientific term for the natural internal clock in the brain which instructs humans as to when they are sleepy and when they are not). This internal clock is influenced by habit, as well as by light and darkness. When there is light outside, it signals the brain to be awake and alert, and when it is dark, it signals the brain to create melatonin. To influence your little one’s circadian rhythm, wake them up at the time you designate as their morning, strip them down and bring them outside to expose them to light. This will help the hypothalamus in the brain to recognize that it is daytime, and will influence their circadian rhythm schedule.

Turn the Lights Up

Just because you have a newborn, does not mean you have to live in a cave. Turn the lights on, open the curtains, and (hopefully) watch your little on wake up a bit more during the day.

how+to+get+your+baby+to+sleep.jpg

Tickle Them

Tickling your newborn’s feet and sides can help to keep them awake during the day. They may squirm a little bit and fuss, but sometimes it’s better to trade a slightly squirmy/fussy baby during the day for a sleepy baby at night.

I hope the above tips help you get your newborn on a regular sleeptime schedule. Comment and let me know if you have any questions, ideas, or if any of these tips worked for you!

XOXO

Charlotte

The BEST Solutions for Your Baby's GERD (Gastroesophageal Reflux Disease)

Coffee with Charlotte earns a commission through the following independently chosen links at no additional cost to you.

Because he was a preemie, my little one had a very sensitive stomach and would projectile vomit his formula, right after we would feed him (or sometimes, even during his feeding). My husband and I didn’t know it at the time, but our baby had GERD (Gastroesophageal reflux disease). We tried so many different formulas, until we found one that worked for him.

The ONLY formula that did not make him throw up or constipated so bad that he would be in tears was Earth’s Best Sensitive Organic Formula. It was the best!

This formula is not the cheapest one out there but it also wasn't the most expensive one either. I looked for manufacturer's coupons and tried to find it on sale, but aside from the occasional sale at Target the only other way that I could get a discount on it was if went on Amazon.com and chose to “Subscribe and Save”. The way that Amazon’s “Subscribe and Save” works is that is you have to “Subscribe” to at least 5 different items monthly; but by doing this, I could get 15% off the price of his formula.

I would just subscribe to items that I knew our family needed anyways and were cheap (deodorant, toothpaste, vitamins, protein bars, etc.). I would have LOVED it if my little one would have been able to stomach the cheaper formulas, but that just wasn’t the way it worked out.  

I also switched his bottle to an anti-colic bottle. I tried a few, and the one that worked best for us was MAM Easy Start Anti-Colic Bottle.

Also, another thing that took away 90% of the vomiting was having him sleep in a Rock and Play sleeper. Unfortunately, the Rock and Play sleeper has since been recalled. The incline helped him to keep the food down, and it also helped to strengthen his esophagus (the doctor told us that as the stomach acid wears down the esophagus and it needed time to strengthen, and that once it did it would help stop the throwing up).

Having our baby at an incline, is what helped the the most for us. An inclined chair like this during the day when you are watching the baby, or after they eat is wonderful:

Our pediatrician said it was OK to have our baby sleep with a slight wedge underneath him, but obviously check with yours to make sure it is OK, as recommendations from pediatricians change frequently and from provider to provider:

Unfortunately, it took us several months of trial and error to figure out the formula and the rock and play sleeper solutions, but thankfully we now know what to do for future babies, if they have the same problem.

Here are some other formulas that did not work for us, but I have heard DOES help other babies, thanks to their gentle formulas:

-          Happy Family Baby Organic Stage 1 Infant Formula Sensitive

-          Enfamil Neuro Pro

-          Goat’s Milk

-          Gerber Good Start Soothe

-          Similac Pro-Sensitive

-          Nutramigen

-         Baby’s Only Lactorelief

-          Similac Alimentum

-          Enfamil Gentlease

-          Happy Baby Organic Sensitive

-          Hipp Organic First Milk Stage 1

-          Enfamil ProSobee (just a heads up – this formula is soy-based, I have heard that you are not supposed to give your babies soy but if you try all other formulas and need to try something else this is an option too).

Please comment and let me know if any of these tips helped you, or if you have any advice for other moms with babies with GERD!

XOXO

Charlotte

How to Make a LOT of Money at Consignment Sales

consignment+sale+tips.jpg

If you are like a lot of other moms, you have a bunch of your kid’s outgrown clothing and toys hanging around the house. Selling your no longer needed items at a consignment sale is a great way for you to turn them into cash and declutter at the same time. Also, in addition to clearing out space, many moms usually will take the money they earn and buy the next clothing size up for their little ones, or toys that they might want.  

How to Consignment Sales Work?

Consignment sales usually keep anywhere from 20-50% of sales, depending on the sale and if you decide to volunteer or not (some sales give you a higher percentage if you help out with the sale). With that being said, they are still worth the time investment because your items are exposed to a lot of people shopping and you can get much better pricing for your items than if you were to sell them at your local yard sale.

What Can I Sell at A Consignment Sale?

What are some things that you can sell at consignment sales? Pretty much anything your child would want or use: clothing, toys, books, movies, shoes, backpacks, costumes maternity wear, cribs, car seats, strollers, Rock 'n Plays, baby swings, breast pumps, bottles, nursing bras, DockATot sleepers, Pack 'n Plays, et cetera! Each sale is different, so check your local rules but most sales accept all of the above as long as they aren’t recalled.

Plan Ahead

When you are getting ready for the sale, make sure you set aside enough time before the sale to get things ready. In the beginning, my husband and I made the mistake of waiting too long and weren’t able to sell all of the items we wanted to get rid of, because we didn’t have everything ready to go.

How Do I Sell My Items At the Sale?

Most consignment sales use an online inventory management system, called “My Consignment Manager”. You will need to follow the consignment sale’s instructions for completing an account and entering your inventory into their system. Make sure you sign up at least a few weeks early, because some sales limit the amount of consigners that sell at each sale.

Having sold at several consignment sales, I LOVE them because they give me the chance to declutter and make a good amount of money. Also, because I have done so many I have learned a few helpful tips along the way that I would like to share with you, because it can be a little daunting getting things together for the sale if you haven’t done so before.

consignment+sales+how+to.jpg

Prepare Ahead

In preparation for the sale, make sure that you get your supplies together – collect your hangers, card stock, scotch tape, plastic baggies, clothes pins, zip ties, tape and scissors.

Card Stock: Most people go with white, but it is helpful to pick a light color / pastel to help you find your items when it comes time to pick them up. Anything higher than a 90lb cardstock is usually good, but you can go with a 110lb cardstock if you would like it to be a little sturdier.

Hangers – Get rid of any unwanted hangers you have, or if you are running low, save money by buying in bulk.

Safety Pins – These help you to keep the clothing on the hangers. I like to go with the large ones, and I buy a large bag of them, which lasts me for a few sales.

Tagging Gun – I have done sales with a tagging gun, and without and found that tagging guns save SO MUCH TIME. They are usually only $15-20 and well worth the investment.

Paper Cutter – This saves time cutting out your tags (I love mine, I picked it up for a couple dollars at an estate sale).

Clothing Rack – This helps to keep your clothing sorted and wrinkle-free. Definitely worth the investment, especially if you are planning to do several sales.

Garbage Bags – We use these to separate clothing, by poking a hole at the bottom and running the hangers through the top, or you can use flagging tape to tie the hangers together.

Ziplock Bags – We use all sorts of sizes: gallon, quart and sandwich are used the most frequently.

Packing Tape – This helps you attach your tags to toys, bags and other items.

Get Your Items Together

Go through your kid’s clothing and toys, setting aside items that your kid no longer wants, needs or plays with any more. It is important to make sure that you have enough merchandise to sell, because consignment sales do charge a nominal fee (usually around $10-20 to consign). If you don’t have a lot of items to sell, a good thing to consider is listing the items in a local yard sale group (if you do this, you won’t have to pay the consignor fee and you will keep all of the proceeds).

Inspect Your Inventory

Inspect your items and make sure that they are in good condition – don’t try to sell items that are stained, ripped, have pet hair on them, broken, etc. Clean your clothing and hang after washing, or steam/iron them (if your items look good they sell better). In this aspect, it’s important to think like a store and only sell items that are in good enough condition that you would buy.

Sort Your Items

Sort your items by size and gender and keep them together after you have finished tagging them (my husband and I poke a hole on the top of a clean garbage bag, and pull the hangers through to keep the clothing separated, but you can also use flagging tape to tie the hangers together).

Get Organized

Once you round up your inventory and sorted, GET ORGANIZED. Write down how many of each item you have – books, toys, clothing (make sure you write down the size, gender and if it is summer/winter). This will help you, when you are entering items into the computer system.

When hanging your clothing, pay attention to how the consignment sale requests you hang the clothing. Most, want you to pin the tag on the shoulder (if it is a shirt). Using safety pins help to keep the clothing on the hanger, when people are sorting through the clothing and shopping.

Price According to Your Goals

Do you want to get rid of the items? Price aggressively and mark that you would like to discount your items, on half-price / discount day (if they have one). If you want to make more money and do not care about selling the majority of your items at that sale, then price in the mid to high price range. At my first children’s consignment sale, I made the mistake of pricing too aggressively. Example: I wanted to get rid of a kid’s Black and Decker workbench, so I priced it at $7 because it did not come with any of the accessories (my son was only interested in the accessories and never used the actual workbench, so it was just taking up space). It sold in the presale night, and, when I looked at other workbenches, I saw that they were priced for anywhere from $30-40. This is where it can be helpful shopping the sales, because you become more familiar with how to price your items. When pricing clothing, make sure to price lower-end brands cheaper than you would boutique brands, to maximize your profit. Usually lower-end clothing goes for anywhere from $2-5, and the higher-end clothing goes for 25-75% of retail, depending on condition, and if the clothing is new with tags (NWT).

Group Your Items

Group toys that are smaller together, people like buying lots of toys and it’s less work tagging them individually.

Don’t Forget the Batteries

Put batteries in your toys (buyers like to see that the items work). You can use batteries that are almost at the end of their life-cycle, to save money or buy them at the dollar tree (I have found good deals on batteries on Home Depot, too).

Sell According to Seasons

Winter clothing does better right before Summer is about to end, and right when Fall begins. If you are limited in clothing spots, take advantage of this and only sell clothes in the season that you are about to go into or have just started.

Decide if You Want to Donate

Decide if you want to donate your items at the end of the sale, or pick up (if you decide not to donate, don’t miss picking them up, or the consignment sale will donate them). Usually, you are unable to get a tax write-off slip if you donate at the sale, so I pick them up and either sell them at another sale, at a yard sale, or donate and get the tax receipt.

Don’t Forget to Shop

Take advantage of shopping ahead of the crowd – Many consignment sales have shopping for consignors before the general public, which is nice, because you can often score some wonderful items at good deals, before they get picked over. Saving money on items you need for your family puts more money in your pocket!

Let me know if you have any helpful tips in the comments below!

XOXO

Charlotte