Swung Glass Vases / Decanters

I saw this post on Facebook and am SO JEALOUS. Years ago I had two Empoli decanters that I had picked up at a yard sale for $3 apiece. I LOVED them, but my husband and I were moving to another state so I had to sell off a lot of items because only so many items would fit in the Uhaul cargo trailer. Mine were cobalt blue and green (the photos below are clickable referral links to Etsy / Amazon, in case you wanted to see more or want one for yourself). They are called Vintage Empoli Glass Diamond Point Genie Bottle Decanters. Mine did not have the stopper on the top.

I am currently on the hunt for swung glass vases from L.E. Smith, but they are getting harder and harder to find. My husband found me one, for which I am very grateful but I would LOVE to make a rainbow. One day. :)

This is the post I saw on Facebook:

“Can you guys BELIEVE I snagged this at a freaking yard sale?! The only reason why I stopped was because I saw the baby swungs sitting on a table from my car. I was looking at them and I picked them up they were only $3. Th Lady who was hosting the sale said “I have more laying in the yard. ”they are only $10. The red one is $25” I about fainted. I almost felt like I was robbing her she then said I can lower the price. I literally said I’ll pay what you’re asking. She had no idea what she had in her yard! She didn’t even know they had a name! She said “I’m selling grandmas things” I ran out of there so quick. I’ve always wanted just one! Now I have start of a rainbow I’m still obsessed to think I almost didn’t stop.”

Just thought I would share. :)

Charlotte

How to Get a Fever Down in a Toddler or Child

When a child has a fever, it can be a worrying time for parents. A fever is a common symptom of many different types of illnesses, and it is usually a sign that the body is fighting off an infection. While a fever is not always a cause for concern, it is important to monitor a child's fever and take action if necessary to bring it down. Here are some tips on how to bring a fever down in an infant or child:

1.      Offer plenty of fluids: It is important to keep your child hydrated when they have a fever. Offer them plenty of fluids, such as water, broth, and sports drinks, to help replace the fluids lost due to fever and sweating.

2.      Use over-the-counter pain relievers: You can give your child over-the-counter pain relievers, such as acetaminophen (Tylenol) or ibuprofen (Advil), to help reduce fever and relieve body aches. Be sure to follow the dosage instructions on the package carefully.

3.      Dress your child in lightweight clothing: Overdressing a child with a fever can cause their body temperature to rise even further. Dress your child in lightweight, breathable clothing to help regulate their body temperature.

4.      Keep the room temperature cool: A cool room can help lower your child's body temperature. Keep the room well-ventilated and set the thermostat to a comfortable temperature.

5.      Use a fever-reducing bath: A lukewarm bath can help bring down a fever. Be sure to use lukewarm water, as hot water can make a fever worse. You can also add a few drops of essential oils, such as peppermint or eucalyptus, to the bath to help soothe your child's symptoms.

6.      Use a cool compress: A cool compress can help bring down a fever and reduce inflammation. Soak a washcloth in cool water and place it on your child's forehead, neck, or chest for a few minutes at a time.

7.      Encourage rest: Encourage your child to rest and sleep as much as possible. This will help their body fight off the infection and recover more quickly.

8.      Consult a healthcare professional: If your child's fever is high or persists for more than a few days, or if they are experiencing other severe symptoms, it is important to consult a healthcare professional. They may recommend additional treatment or medication to help bring down the fever and alleviate other symptoms.

It is important to note that fever is a normal and necessary response to illness. It helps the body fight off infection and can be a useful tool in the body's immune system. In most cases, a fever will resolve on its own without treatment. However, if your child's fever is causing discomfort or is accompanied by other severe symptoms, it is important to take action to bring it down and seek medical attention if necessary.

It is also important to be aware of the signs of a fever that requires immediate medical attention. These can include a fever that is higher than 104°F (40°C) in infants under 3 months old, a fever that persists for more than a few days, or a fever accompanied by other severe symptoms, such as difficulty breathing, severe abdominal pain, or a rash. If you notice any of these signs, it is important to seek medical attention immediately.

In conclusion, a fever is a common symptom of many different types of illnesses in children, and it is usually a sign that the body is fighting off an infection. While a fever is not always a cause for concern, it is important to monitor a child's fever and take action if necessary to bring it down

Art Deco, Art Nouveau and Victorian Prints

I love art, and I have a special interest in Victorian, Art Nouveau, Art Deco, Victorian and 1940’s – 1950’s prints and paintings. With this being said, I own an Etsy shop called PurdyLittleBirdie.Etsy.com, and sell fine art reproductions of artwork that is in the public domain (meaning, the artwork was created so long ago that the copyright has expired and is free for public use). Check out some of my favorite artworks that I offer prints of, and the stories behind them:

This print is by Alberto Vargas. He was a Peruvian-American painter of pin-up girls, and he is often considered one of the most well-known of the pin-up artists. His sensual yet tasteful portrayals of women have become iconic wall art and art prints. Vargas' work embodies the elegance and allure of the era, making it a popular choice for vintage art enthusiasts. This print is perfect for adding a touch of 1920's glamour to your space.but this one is a departure from his normal pin-up style, perhaps because it was an illustration… but it is my favorite artwork of his. The colors in this print are so vivid. When I edit the prints, I carefully remove any blemishes, rips or discolorations and edit the images so they closely match what the artist originally intended them to look like before time made it’s mark on the piece with fading or discoloration.

This is a bright, colorful print of the The Three Muses, who were associated with Aphrodite (the goddess of love). In Greek mythology, the three daughters of Zeus and Euryoneme were named Thalia, Euphrosyne and Aglaia. I love this print, they look so ethereal and remind me of fairies.

This print is based on “A Midsummer Night's Dream”, by William Shakespare. The original was by Edward Robert Hughes.

This print of a vintage mermaid is by an anonymous artist, it used to be the cover art for a 1910’s steamship menu. I edited the scan, color graded, repaired the tearing and water damage and made a gorgeous print. I love it so much, and am glad this beautiful water maiden is not lost to history.

This print is by FX Leyendecker (Frank Xavier Leyendecker) who was a famous American Illustrator, and a contemporary of his brother, JC Leyendecker and Norman Rockwell. He painted many covers for life magazine, and this one was the cover for Life Magazine in February, 1922 titled “The Flapper”. So pretty! I love how early 1900’s – 1920’s fairies were often depicted as female butterflies.

This is another print by FX Leyendecker, This is such a sweet image of a young Art Deco couple in love.

This was from Alphonse Mucha’s Cognac Bisquit poster. I love the coloring in this advertisement and her pose.

Alphonse Mucha, was well known for his Art Nouveau women. This print is from one of his most well-known artworks, Job Rolling Papers. He did several rolling papers advertisements, and I offer prints of a few different ones.

Super Cute Glass Blown Christmas Ornaments

I love blown glass Christmas ornaments… They are so elegant and delicate at the same time. Here are a few blown glass ornaments that would make the perfect addition to a coastal beach house Christmas decor scheme. The photos all link to the Amazon page where they are listed. There are so many sweet glass ornaments. My favorites are the mermaid ornaments, the shell ornaments, and the jellyfish ornaments. Just so you are aware, I am an affiliate, which means if you do happen to like any of these items and purchase them I may receive a small referral fee (which helps to offset the cost of running this page) but I do not recommend any items that I do not think are cute or would not purchase myself.

Scallop Shell Glass Blown Ornament for Christmas Tree

Sand Dollar Glass Blown Ornament for Christmas Tree

Christmas Ornaments: Beach Shells Glass Blown Ornaments for Christmas Tree, Oyster with Pearl

Ornaments for Christmas Tree Hammerhead Shark

Christmas Beach Glass Blown Ornaments for Christmas Tree Junonia Shell, Tan/Brown/White/Gold

Christmas Ornaments Orca Whale Glass Blown Ornaments for Christmas Tree

Red Starfish Glass Blown Ornaments for Christmas Tree

Christmas Mermaid Sea and Water Animals Glass Blown Ornaments for Christmas Tree

Old World Christmas Glass Blown Ornaments for Christmas Tree Small Turtle

Manatee Glass Blown Ornament for Christmas Tree

Old World Christmas Ornaments: Sea and Water Animals Glass Blown Ornaments for Christmas Tree, Neptune

Old World Christmas Golden Seashell Glass Blown Ornament for Christmas Tree

Glass Jellyfish Ornament for Christmas Tree, 13" Beach Beaded Christmas Ornaments, Hanging Coastal Xmas Decoration, Set

Old World Christmas Nautilus Shell Glass Blown Ornament for Christmas Tree

Glass Blown Ornaments for Home Decoration, Festival Gift, Blue Turtle

Humpback Whale

Vintage Coastal Christmas - Blue, White and Green

I love these cute blue, white and green Coastal Christmas ideas, and I hope you do too. They are so perfect for a beach home Christmas house. Personally, I am drawn to the handmade or vintage looking items, which is why all of these photos are linked to the Etsy shop owner’s pages. Just so you are aware, I am an affiliate, which means if you do happen to like any of these items and purchase them I may receive a small referral fee (which helps to offset the cost of running this page) but I do not recommend any items that I do not think are cute or would not purchase myself.

This is a beautiful handmade Seaglass Christmas tree. I love the turquoise, yellow and periwinkle blue colors!

Here are some more gorgeous sea glass christmas trees… if you click on the photo it will take you to the sea glass Etsy listing, or you can click here.

Beautiful oyster shell Christmas tree, coastal Christmas decor, coastal farmhouse decor, oyster shell Christmas decor

Sea Glass Christmas Tree Ornament - such a cute Coastal Christmas or Beach Christmas decor idea!

This Oyster Shell Tree that lights up is a nice alternative to the normal Christmas trees you see when for Christmas, and is soooo cute! :)

(This post contains some affiliate links, which means when you purchase an item I may receive a small commission – but I only make referrals for items I love or companies that I know offer great services and deals.)

Check out these fun Halloween decor and gift ideas. I love them! I have linked the photos to the Etsy listings, in case you like them too:

Cute Halloween Decor Idea

(This post contains some affiliate links, which means when you purchase an item I may receive a small commission – but I only make referrals for items I love or companies that I know offer great services and deals.)

I was in a Facebook group and I saw the cutest Halloween Décor idea! One of the members in a Vintage Swung Vase group I am in (click here to check swung vases out on Etsy.com) has a really creative idea for Halloween décor. She adds googly eyes and antenna to make them into “Yup Yups” from Sesame Street. So cute! 😊 I loved them so much that I asked her if I could share, and she said I could so check them out: LINK

I love that she made the Orange LE Smith bittersweet vase into a Yup Yup, and the white swung vase into a Ghost. So cute! :)

Thanks for checking my page out!

Charlotte

The Ultimate Hospital Bag Checklist

(This post contains some affiliate links, which means when you purchase an item I may receive a small commission – but I only make referrals for items I love or companies that I know offer great services and deals.)

Congratulations! You are about to give birth. :) As you are getting ready to go into labor you may be wondering “What do I bring with me to the hospital?” or “What do I need in the delivery room?” (Especially if you are a first-time Mom). With my first baby, I ended up in the hospital for about a week due to pregnancy complications, so there were things that I brought that made my life easier. Subsequently, I have had three kids (my littlest is one) and these are the items that I bring to the hospital every time. 😊

A Suitcase with Wheels – This is helpful because when you are checking out of the hospital you will have a lot of things to manage, having a suitcase with wheels helped us a lot. We saw a lot of other couples with several items in duffle bags, grocery bags, pillows under their arms, etc. and all of that could easily fit in a suitcase with wheels. It just made things easier for us. We have one similar to this one:

Fluffy Robe – Hospitals are cold places and I was so thankful to have my fluffy robe. Several nurses have come into my room and told me I am smart for bringing it. The hospital has thin sheets but if you are somebody who gets cold easily you will be so grateful for a warm robe.  If you want something lightweight these lightweight waffle spa robes are nice to have, too.

Hair Ties – This is a must-have; it helps to keep the hair out of your eyes for labor and delivery. I love these velvet scrunchies because they don’t pull on your hair as much.

Socks with Grips – Ideally at least 4-5 pairs you would be OK with tossing afterwards. I’m just saying…

A Large Cup for Water with a Lid - You will be going through a lot of water and this saves trips down the hall to fill up. :) This one is 30 ounces and has a straw and a lid and is very affordable.

Snacks for Dad and Food for You After Labor (Usually you can’t eat when you are in active labor, but it’s nice to have something for after you give birth, and sometimes the hospital cafeteria is not open at 3:00 AM or whenever you finish delivering and you are hungry. The hospital sometimes has some cold sandwiches in the fridge but that’s not guaranteed and is dependent on the hospital).

Comfortable pillow or a Travel Pillow – I like having my own pillow when I go places, so this was a must have for me. At the hospital I went to, the pillows at the hospital were disposable so they were not the best quality…

Car Seat – If you make sure it is installed ahead of time it makes things easy for when it’s time to leave the hospital, normally they do not let you leave the hospital without making sure it is installed correctly. Here are a few different options.

Microfiber Blanket – This was one of my favorite items that I brought, it is so nice to have. The sheets were super thin at the hospital so it was nice to bundle up in this.

Toiletries (Toothbrush, Toothpaste, Deodorant, Lotion, Shampoo, Conditioner) Some hospitals provide these items but many do not. It’s also nice to have your own items that you are familiar with the quality and brand – having your favorite body wash and shampoo helps make you feel more like yourself after you give birth. Labor and Delivery can be exhausting.

Phone, Charger and Extension Cord – the first two are self-explanatory, but the extension cord is nice because sometimes you are not near an outlet.

Makeup – For after-birth photos

Mints / Gum – For you and/or your husband

(If you have one) a Retainer or Mouthguard – With my first I hurt my teeth clenching down so hard, the second two deliveries went much better because I brought a mouthguard.

Camera / Phone for Taking Pictures – You can take some very good photos with your phone and that would be all you would need, but some people like to take photos with a higher quality, if that’s what you want this is an entry level Canon DSLR that takes really nice pictures.

Baby Blanket – The nurses used one of my microfiber blankets to keep the baby warm when he was in the bilirubin light machine, they loved how soft mine were.

Comfy Clothing (Large Pants, Easy to Open in the Front Shirts, Dresses, etc.)

Clothing for Dad

Small Fan (if you run hot this is nice to have)

Nursing Bra + Breast Pads + Lanolin Cream (If applicable)

Nursing Pillow (if applicable)

Laptop/Tablet: In case you want to watch movies or listen to music while you are waiting for things to ramp up (it can take several hours if you are being induced, with one of my kids I checked into the hospital at 8:30 AM for inducement and delivered at around 1:30 AM).

Cute Clothes for Hospital Pictures (for you, baby’s father and the baby)

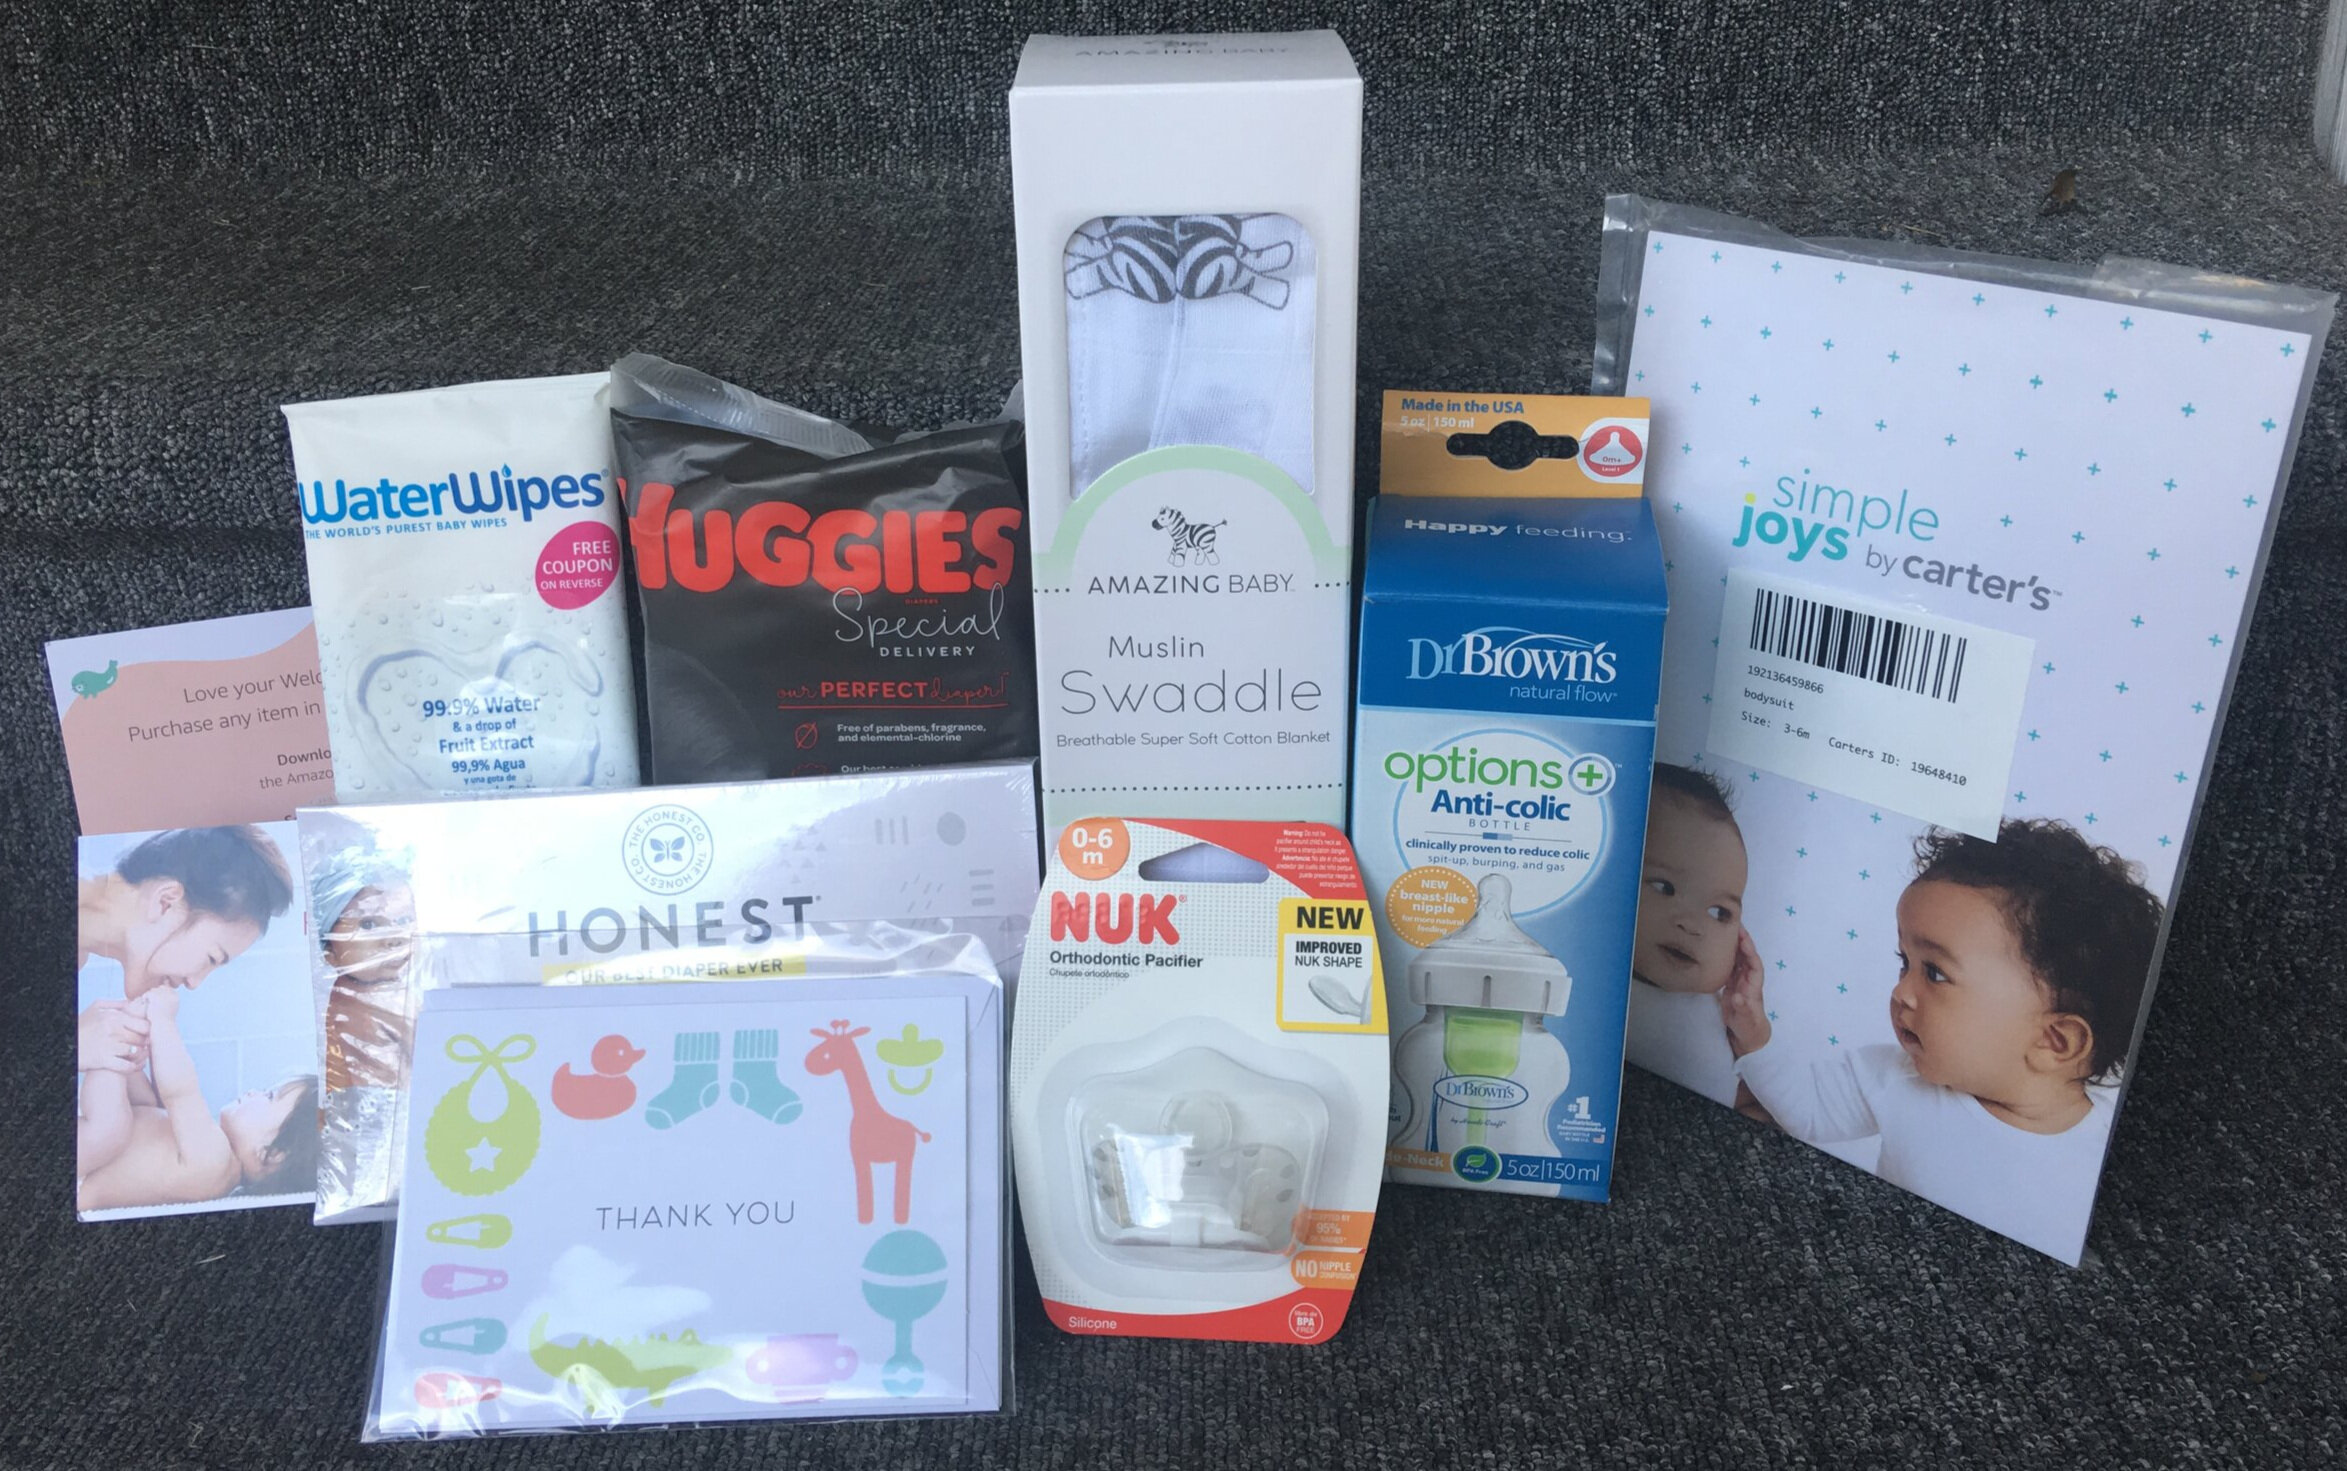
Diapers, Wipes and Diaper RashCream (possibly) – The hospital may provide these, mine did. But you will need them for after you come home. My favorite Diaper Rash Cremes are Aquifer and Boudreaux’s Baby Butt Cream. One is petroleum based and one is zinc oxide based, if one does not work on the rash the other one usually does.

After Delivery:

After your labor, the hospital will provide you with pads, a perinatal bottle, pain killers, etc. But these were items that I realized I needed after giving birth:

Perinatal bottle: Frida Mom Upside Down Peri Bottle (the one they provide you is OK, but it is cheaply made and it doesn’t clean out down there as well as THIS ONE does. It feels amazing (with warm water) and helps to more effectively dissolve your stitches than the other one you get - trust me on this one. I loved mine.

Adorable Baby Clothes for Coming Home

Large Granny Panties OR Adult Diapers – Don’t laugh at the adult diapers, these are really nice for postpartum. It’s nice throwing them away and they provide better coverage than those pads which can move in the middle of the night… if the pads move you will be throwing your underwear away and possibly staining your sheets and bedspread. My first I refused to buy adult diapers, but my second two I did and it was so nice not to ruin my clothes and just be able to toss them.

Nose Frida / Syringe Bulb and a Humidifier - Something I did not initially realize is newborns very easily get congested. A humidifier really helps with the congestion, and a Nose Frida helps to clear their airways. If you are going to go with a syringe bulb you should consider getting one like this one that can be taken apart and cleaned out, it’s much more sanitary.

Anyways, I hope this list helped! You’ve got this 😊 Wishing you a happy, safe and magical delivery.

Take care,

Charlotte

Space Birthday Party

(This post contains some affiliate links, which means when you purchase an item I may receive a small commission – but I only make referrals for items I love or companies that I know offer great services and deals.)

For the boys’ joint birthday party we decided to do a space themed party, since my five year old is obsessed with outer space and the Solar system (the one year old didn’t voice an opinion otherwise, lol). Here’s why we did: 

For party decorations I wanted to find a large piece that was a focal point for the party, so I ended up getting a large space shuttle pool floaty. It looked just like a space shuttle and it had another use for after the party, which was nice. I found these amazing silver iridescent plastic tablecloths from the dollar tree, which I used to cover up the bookshelves and make the room more on-theme. I chose the cool silver version but they also had a gold version, as well. 

I found these cool Silver Metallic Tinsel Foil Fringe Curtains on Amazon that I used for the doorway and the wall, for ambiance. We also got some cute gold stars for the wall and some nice wall tapestries. I thought that the wall tapestries were very affordable, and really made a difference in the room. Additionally, I bought a paper plate / paper cup / utensils and decoration kit that came with a happy birthday banner and balloons that we hung up. 

For the food we decided to go low-maintenance and have pizza and salad. I made these charming little space-themed names for the vegetables. The pizza was called “Flying Saucers” and the coffee for adults was called “Rocket Fuel” the salad was called “Galaxy Veggies”, tomatoes were called “Alien Orbs” olives were called “Asteroids”  celery was “Saturn’s Rings” and the bell peppers were “Rocket Flames”.   

For the party games, we did a Rocketship pinata and a Solar System Dart Board Game. The party favorite was the Solar system throw game, the adults even liked it and I would have people compete one-on-one, with the winner winning a prize. I gave out full sized candy bars as prizes that I purchased from the Dollar Tree as prizes / party favors. The Rocketship pinata was nice because you could either hit it with a baseball bat, or you could pull strings on it to make the candy come out. We ended up going with the string option because there were little kids at the party. I filled the Rocketship pinata with fruit snacks and little candies and I had bought some fun solar system stickers but they did not come in time.  

The boys wore their space suits (baby/toddler / boy’s space astronaut costume and men’s costume) that they wore for Halloween. Underneath they had these fun solar system shirts on, in case they got too warm in their spacesuits. On the table I used some of the space toys he had gotten for Christmas and placed his space helmet on the table for added decoration. We got the helmet from HomeGoods a little while back but they also have them on Amazon. Depending on your budget, if you wanted to get space helmets as party favors it would be a cute idea. I thought about doing that but ended up passing on that idea.  

I had some cool NASA prints that I hung up on the walls, I actually sell art prints so I had printed these already and had them on hand.

The cake was from a local bakery, my mother-in-law had picked it up and it tasted amazing! 😊 I love that it matched the solar system theme.  

For space-themed birthday gifts I purchased some nice boy’s space themed pajamas, which were really cute. Here are some other fun space-themed birthday gift ideas (we already have a lot of these). My son likes this space robe and received these space toys for Christmas last year or already has these space toys and really likes them: 

I got the candy bars and the gift bags, tissue paper and cards from the Dollar Tree (they have the best deals on those items, I have found).  

All in all, it was a fun birthday party and the kids had a blast (pun intended).  

Where I got the items: 

Amazon: 

·         Inflatable Space Shuttle Ride On Pool Float for NASA Astronaut Party Supplies, Summer Water Pool Toys for Kids

·         Gold Stars Garland

·         Large Dart Board, Boys Toys, Board Games for Kids

·         Space-Themed Outer Space Party Supplies (Cups, Plates, Forks, Banner)

·         Solar System Wall Tapestry

·         Pull String Rocket Ship Pinata for Outer Space Birthday Party Supplies, Astronaut

·         Silver Metallic Tinsel Foil Fringe Curtains

·         Solar System Planets Science Space Boys Girls STEM Kids T-Shirt

·         Space Planet Tapestry Galaxy Universe Planets Tapestry Solar System Tapestry Wall Hanging Tapestries for Bedroom Living Room Apartment Dorm Decorations

Toy Ideas:

·         Boys Pajamas 100% Cotton Planet Pjs Toddler 2 Piece Sleepwear Kids Clothes Set

·         Kids Robe Soft Fleece Hooded Bathrobe Sleepwear for Girls Boys

·         Melissa & Doug Solar System Floor Puzzle

·         NASA Space Adventure Series: Space Shuttle with Lights & Sounds & Figure,

·         Glow in The Dark Stars and Planets, Bright Solar System Wall Stickers -Glowing Ceiling Decals for Kids Bedroom Any Room, Shining Space Decoration, Birthday Christmas Gift for Boys and Girls

·         Rocket Ship Play Tent Pop up Play Tent Kids Indoor Outdoor Spaceship Playhouse Tent Set

·         boy’s space astronaut costume 

Marshall’s:

Space Helmet


 Dollar Tree:

Candy Bars

Tissue Paper

Birthday Cards


Thanks for reading 😊 Let me know if you have any questions!


Sincerely,


Charlotte

Shipping Mistakes I Made as a Reseller and How to Avoid Them:

(This post contains some affiliate links, which means when you purchase an item I may receive a small commission – but I only make referrals for items I love or companies that I know offer great services and deals.)

One of the major hesitations that holds people back from reselling is the unknown shipping costs. This was true for me, when I started selling things online I would often underestimate how much an item would cost to ship. There are several ways to save money on shipping costs, and I am going to let you know some of my favorite shipping tips that I have learned over the years. One way to not undercharge on shipping is to weigh and pick out your shipping box ahead of time. By doing this, you can put in the specific item dimensions into your reselling platform (Etsy, eBay, Facebook Marketplace, etc.) and their system will automatically charge the purchaser for the cost of shipping. One thing that I like to do when I weigh items is that I always round up to the next ounce, or even add a few ounces to offset the cost of packaging. As a novice, do not offer free shipping, unless you have been doing this a while and know how much the item will cost to ship and you are okay with picking up the cost yourself.

I use a small food scale to weigh my small boxes (similar to this one), but for larger boxes I purchased this scale that has the screen readout to the side, because it is hard to read the weight with the smaller scale and there is a weight limit.

Another way to not undercharge on shipping is to get flat rate boxes from USPS. You can often pick them up at the USPS store, but if they do not have the size you are looking for you can order them for free from the USPS website. They have three sizes (large, medium and small). If your item fits in these boxes then the item ships for a flat rate. Flat rate shipping boxes are wonderful for shipping heavy, relatively small items. If your item is light and small you may save money by shipping the item in another box and weighing it. A lot of novices do not realize this, but if you ship in a flat rate box you have to purchase flat rate shipping, so it is smart to save other boxes if you do not want to use this service.

Another thing I did to help me scale my business was purchase a thermal printer. I used to spend a lot of time printing on paper and cutting and taping the paper to my boxes; but I saw several other resellers talking about thermal printers and how it saved them time and money on shipping and I finally gave in and bought one. What is a thermal label, you may wonder? Thermal labels are labels are the ones that you will often see on your boxes you receive from Amazon, Best Buy, Old Navy, etc. They are stickers that are printed using a special printer that uses heat. This saves money time and money because you do not have to purchase ink and paper, and you can quickly print off the labels and stick them on the box (instead of manually cutting them out and sticking them on the package). I purchased my label printer and immediately regretted not purchasing it sooner. My sister likes to sell items online too and she told me she didn’t want to purchase a thermal label printer because she was scared the ink would bleed, so to test if it would do that or not but I submerged the label under water for several minutes and showed her that it did not bleed. In fact, it holds an advantage over the inkjet printers for the paper bleeding. The only thing you have to worry about with thermal printers is the heat print does not last for years, similar to how your receipts will fade over time or if in direct sunlight for weeks (receipts are printed in a similar manner using heat to imprint on the pages). After reading reviews I purchased a Rollo Printer and these labels, but a lot of people like other brands - I just picked the one that fit the price point that I wanted and had good reviews. The printer I purchase has since sold out, but they have this newer model which has WiFi (mine does not) and I will be replacing mine with the newer model soon.

Another item I am really happy I purchased and helps me save a lot of time with shipping is this Packing Tape Dispenser. It is a lot easier for me to cut packing tape using this dispenser, instead of a moving box dispenser that I used to use. It is another “I wish I bought this sooner” item. This is the tape I use and this is the dispenser:

Additionally, I save a lot of money purchasing my shipping from PirateShip.com verses purchasing directly from USPS or UPS. Pirateship will often give me a 20-30% discount on the cost of shipping, which I wish I would have known when I first started selling online. I wasted a lot of time and money purchasing the shipping from USPS directly and often there was a line. This made me not want to list and ship items online, because of the time and energy spent shipping items. This is not a referral link for Pirateship and I get nothing from recommending them to you, other than truly letting you know that I LOVE using their service because you can quickly compare rates between UPS and USPS and you can save a large percentage on shipping costs using them. Sometimes I have found that shipping with UPS saves me a lot more money than shipping with USPS, especially when I am shipping larger items or heaver items that will not fit in a flat rate box. Pirateship lets me easily price compare between the two companies. Another feature I like about Pirateship is that they will create a scan sheet for you to take to USPS. This is important, because during the pandemic a lot of resellers did not manually scan in their packages (they just dropped them off) and USPS never did the initial scan.  When they packages arrived late (or not at all) customers on Etsy and eBay automatically got refunded, much to many resellers’ dismay. If they had done the initial scan then they would have proof that it was a mail carrier issue and that the item was on the way. Usually if you go to the post office and you only have 1-3 items you are shipping the mail clerk does not mind scanning them, but I sometimes have 10-20 items I am shipping out, and even 75-100 items at a time during busy times. A scan sheet has all of the barcodes linked to one barcode, so if the mail carrier scans it the system will automatically show that you have shipped your items and will have the initial check-in scan.

Finally, I sell a lot of items that are the same size, and have found that buying shipping supplies from Amazon is often the best deal, with the exception of bubble wrap and packing paper, I have found the best deals at a home improvement store such as Home Depot or Lowe’s.

I hope this helps - let me know if you have any questions 😊.

Charlotte

The 3 Best Baby Registries and Tips for Creating Your Baby Registry

This post contains some affiliate links, which means when you purchase an item I may receive a small commission – but I only make referrals for items I love or companies that I know offer great services and deals.

There are advantages to creating a registry for your baby. It helps you keep track of what you still need to buy for your newborn, and it’s easy to send to family and friends that ask what you still need for your little one. Also, you often will receive extended return options beyond what the store normally offers.

mon-petit-chou-photography-hMebrpmG8iU-unsplash.jpg

Baby Registries Compared

In my research, I have found that Target, BuyBuyBaby and Amazon are the three best baby registries to use. All of them give you really nice freebies for creating a registry, plus they send you a percent off coupon closer to your due date so you can buy the missing items at a slight discount (they call this a completion discount).

BuyBuy Baby

With my first baby I made a BuyBuy Baby registry, and I was amazed by the selection that they offer in-store and online. When I made a registry with them I received a really nice gift bag in-store when I went there and it had several full-sized items including a pacifier, a bottle, coupons and several samples. BuyBuy Baby registries are nice because they allow you to use both their coupons and Bed Bath and Beyond’s coupons as well (they just cannot be expired). This often made their baby items significantly cheaper than their competitors. With this being said, make sure you sign up for their coupons! When you are buying a stroller the 20% off can really help. I bought practically everything I needed for my firstborn from there. Click HERE to check out BuyBuy Baby’s registry program.

Target

I also created a registry with Target because when you do, they give you a really good bag of freebies, and you don't have to buy anything either to get it. This time I got a Dr. Brown's baby bottle, a full-sized swaddle, pacifier, coupons, samples, etc. I really love registering at Target because their store is well-stocked with baby items and, they give you a 15% discount on everything left on your registry (8 weeks before the baby is to arrive). Their selection is very modern and you do not need a receipt when you return items to their store if it was on your registry. Plus, they offer free shipping if the purchase is over $35 or the purchaser uses their REDcard. Click HERE to check out Target’s baby registry program.  

Photo of all of the goodies I got in my Target Registry Gift Bag

Photo of all of the goodies I got in my Target Registry Gift Bag

Amazon

I created an Amazon registry for my second, and in doing so I received free $30 welcome box for registering and buying at least $10 worth of stuff off it... Here is the link that explains the program: https://amzn.to/2mb9zRI.  I just received the box from Amazon and received a good amount of full-sized items, as well as some small freebies too. This time I received a swaddle cloth, Dr. Brown’s bottle, and samples but I have heard that what is in the box changes and in the past, they have given out boxes of diapers and onesies and other nice items. Click HERE to check out Amazon’s baby registry program.

Picture of all of the goodies I got in my free Amazon Registry gift box.

Picture of all of the goodies I got in my free Amazon Registry gift box.

Baby Registry Tips:  

  • Make sure you register for a good mix of items, high price-point and low price-point. If you think you will need it or want it, register for it. You will receive a discount if friends and family do not buy it for you and they don’t you will receive a discount coupon. Also, many times people like to either buy a big-ticket item or several small ones. By registering for a lot of items you are giving people options, and options are always a good thing!

  • Register for a variety of sizes – Something I didn’t realize is that babies grow FAST. My son was a preemie and was only in preemie clothing for less than a week. He was in newborn clothing for a while and then went on to size 0-3. He even skipped a size at one point (which can make it hard when you are trying to buy clothing ahead, on sale). With this being said, you will probably receive a lot of smaller sizes in the beginning. I would also register for some larger sizes so you have a good mix.

  • Register for everyday items, such as diapers, wipes, bibs, burp cloths, butt cream, bottles, pacifiers, etc.

picsea-RW1GPQFNy-A-unsplash.jpg
  • Ask your friends with babies what their favorite baby items are, you might be surprised. For example, one of my son’s favorite items that he received was a light-up bug toy. He LOVED it, and if I didn’t receive it as a gift I would not have known about it. Several of my nieces and nephews have since received it as a gift and they love it too.

  • Buy Gender Neutral (if you are planning on having more than one child). I am currently pregnant with my second child (girl) and I am able to use a lot of the same items purchased for my firstborn (boy) because I did this.

Hope these tips help you!

XOXO

Charlotte

 
The 3 BEST Baby Registries
 

How to Save Money on Your Wedding Venue

When planning your wedding, it is hard to believe how quickly costs can add up. After having photographed several weddings, I have learned a few tricks to save money on your wedding but still have a great event.

This is a photo from a wedding that I photographed at Koreshan State Park in Estero, Florida.

-  The Beach: If you are a bride on a budget and you are a beach person who would not mind having your wedding outdoors, I would strongly suggest having your wedding at the beach. Before you have your wedding at the beach, make sure that you get in contact with the local Clerk of Courts office regarding your marriage license, and contact the local beach officials in order to make sure that you do not need any special permits.

juyxuyxik.jpg

- Backyard Wedding: Don’t overlook having a backyard wedding. Some of the prettiest weddings that I have ever photographed have been backyard weddings. If you live in a location that has a pretty view and a large space (or have a friend or family member who does) then you should consider this as an option – just make sure you have a backup plan in case it rains (such as a tent).

 -  Government-Owned Properties (State Parks and Reception Venues): This is the route I took when I got married. The local city often has beautiful buildings or properties that are donated to them, and they rent them out at a price that would be significantly cheaper than a privately-held venue. When I got married, my dream venue was actually a beautiful building that was donated to the city, and it was so cheap to rent! For six hours, it only cost $250. If a beach or backyard wedding isn’t what you are looking for, you should seriously consider going the government-owned route.  

Depending on what look you are going for, you can have a beautiful wedding that was done on a budget. I hope these tips help you with your wedding planning. Check back for future money-saving tips!

Take care,

Charlotte

How to Make a Monthly Budget

how to make a budget and stick to it res.jpg

What are Budgets?

Budgets are a helpful way to plan your finances. A lot of times, individuals and families spend more than they would like, but have trouble determining where their expense overages are. Budgets are useful tools to determine where your money is going and decide where you want it to go. By making and sticking to a budget, you can become in charge of your finances and make financial goals that benefit you, rather than living stressed out every month because you only have a few dollars left in your bank account. Here are some simple steps that show you how to make a monthly budget:

Write Down Your Monthly Income

Taking into account both your income and your spouses’ income, write down your total take-home pay (after taxes and any withholding has been taken out).

List Your Household Expenses

This includes your mortgage, electric, food, gas, car insurance, health insurance, cell phone, internet, student loans, cable, etc. Do not forget any expenses that are paid quarterly vs. monthly (such as your home owner’s association expense). Some of your expenses are fixed every month, and some are variable. For example, your rent/mortgage is a fixed expense (it stays the same every month); however, the cost for gas for your car might vary month to month. With that being said, please estimate variable expenses in your budget. One of the best things that you can do in creating a monthly budget, is to track your ACTUAL expenses each month. You should look at the past 3 month’s bank and credit card statements to see where you are actually spending your money and estimate your monthly spending using your previous spending as an indicator.

Do Your Expenses Exceed Your Income?

Uh oh! If your expenses exceed your income, you will need to cut back. If they do not – you are on the right track! Even if you do not spend more than you earn, this is not to say that you cannot cut back on household expenses to save more money or pay down your debt sooner.

Determine Your Target Spending for Each Category

On a sheet of paper, write down your actual expenses for your fixed monthly costs (mortgage/rent, car payments, internet, cable, student loan payments). Then, write down your actual expenses for your variable expenses (eating out, groceries, gas, gifts). For the most part, variable expenses are much easier to cut down on than fixed expenses (although, in many cases fixed expenses can be modified, too). Looking at your actual spending and taking into account your income, what are your target spending goals for each item? Write that down on the Targeted Expenses column (see example photo below).

budgeting pic res.jpg

Think about ways that you will be cutting costs in each category. Do you eat out a lot? Maybe you need to stop by the grocery store and have more easy-to-make meals on hand. Do you spend a lot in gas? Maybe plan your trips around a certain route, or carpool with a friend/spouse to work. There are little things you can do to cut your budget in the different areas, I will be going over them in future blog posts.

Create a Safety Net

Initially, you should set aside a small fund to “float” you if any unexpected costs come up. This fund should be enough to help you make it until your next paycheck, so you are not getting further into debt by racking up credit card debt OR borrowing money from loan sharks. Everybody is different in the amount they are comfortable with, but many people feel that a figure around $1,000 to $3,000 is a good amount to set aside as a safety net.

Pay Down Debt and Start Saving

how to budget

After you set aside your money for your safety net, if you are in debt, any extra money that you save needs to go towards your debt. Make sure that you are paying the monthly minimum amount due for all your loans. Then, when paying down your debt, you should prioritize putting extra money on your loans with higher interest rates, such as credit cards. After you pay down your credit cards, then you pay your other loans off (student loans, mortgage, et cetera). Once a loan is paid off, you should put the money you were paying on the previous loan towards your next debt on the list. Once all of your debt is paid off, any extra money needs to go towards savings. You should build up your savings so you have money in case something (Heaven forbid) happens. Many financial planners say you should have three to six months’ worth of savings in the bank. The best place to have this money is in a savings / money market account, so you are earning interest on the funds, but it is still accessible to you.

Live Freely

From this point, the money you have saved can go towards saving for your retirement, and/or paying for big-ticket expenses that come up (car, college, house) in cash, or at least putting a large down payment down. Not all debt is bad; however it does limit you in what you are able to do in life. Additionally, debt can add up and the cost is not worth it. Lenders like to take on fees and interest, transforming a $10,000 loan to a $11,000 loan, before you have even needed to make a payment. Over the life of the loan, you could be paying $25,000 to borrow $10,000 (depending on the interest rate and the loan term).

I hope this helps you in creating your budget plan. If you have any questions regarding making your personal budget, please do not hesitate to reach out!

XOXO

Charlotte

Update

2014_CSK_05298_0073_000(georges_picard_romance_under_the_blossom_tree) resized.jpg

I have been meaning to get more creative with my editing process. I usually use Photoshop to edit my images, but I just purchased an iPad * (Amazon is running a huge sale on them right now, a lot of them are 20-30% off) and I am excited to check out procreate and start using it.

I have been working a lot more in watercolors and am looking forward to seeing what more I can create, on the go! I will share some images when I have more to share. :) Stay tuned!!!

XOXO

Charlotte

(*As an Amazon Associate I earn from qualifying purchases.)

Discipline Methods for Reeling in an Unruly Child

Do you need some advice on various discipline methods? Sometimes our current methods do not cut it, and it can seem like nothing is helping. We polled various mothers to see what punishment methods work best for them and compiled them for you below. Hopefully one of these methods will work for you! When punishing, remember every child is different and what works for one may not work for another. Just try to be patient, and trial and error until you find what works.
Be consistent with whatever you do, caving in will only give them power. Make sure to remind them lovingly but sternly that you are the parent. (Additionally, please use your discretion before applying any of these methods, as each child is different and responds differently to various punishment methods):

·         Positive reinforcement and praise

·         Praise a sibling for behaving in a way that you would like the disobedient child to behave

·         Provide child with special treats if they behave the way they should each week

·         Time outs – a good rule of thumb is 1 minute per age. After the time out, it is helpful to discuss why they were placed in time out and hug it out afterwards.

·         Take toys away

·         Sit down with the child, talk calmly and empathize with them or take them away from the frustrating situation and hold them and calm them down.

·         Ignore tantrums

·         Provide positive and negative consequences for their behavior (do good, receive reward, do bad, face the consequences for your actions).

·         Correct them and redirect them, if they are young

·         Corporal punishment (spanking, pinching, etc.)

Ideas to Get Your Toddler to Stop Using a Pacifier

Some children couldn’t care less about using a pacifier, and others are absolutely obsessed. Eventually, many children make the transition to give up their binky on their own, but for the stubborn remaining few, here are a few tips to get your toddler to give up their pacifier:

Gradually Take it Away

If your little one uses their pacifier all the time, start to gradually limit the amount of time that they use it. Take it away in the morning, then eventually during the day, then allow them to use it only at bedtime, then phase out the pacifier completely. It helps if you have them voluntarily give it up, so they feel ownership over the decision to stop using their pacifier.

how+to+get+toddler+to+stop+using+paci.jpg

 “Break” the Pacifiers

Part of the pacifier’s allure is that it allows them to suck it and the sucking motion soothes them. If you poke a hole at the end of it or snip the ends off them, it removes the pleasure of sucking the paci, because it will then “give” a little while they suck it. They may decide to toss the pacifier on their own at that point.

Have Them Throw it Away

If you feel that your toddler is willing, you may be able to convince them to help you throw them away. Not many toddlers would be a good candidate for this strategy, but it is worth a shot.

Buy Them Something They Want and Use the Pacifier as “Money”

how+to+get+toddler+to+stop+using+a+pacifier.jpg

Is there something that you know that your little one would want, and would be willing to give his / her pacifier up for it? This is the route to go. Tell your tot that to receive the new item, they will need to “pay” for the item with their pacifier. Some toddlers will wholeheartedly trade their pacie’s for the new item.

Have Them Give it Away to Babies in Need

Some toddlers are very aware of other babies out there, and empathetic to their needs.

Have your little one “mail it” to the hospital for new babies. They can assist with decorating the envelope and sealing it, and if they ask about their binkies let them know that the new babies need it more and appreciate their donating it to them. Of course, if it were me I would actually give it to a friend / family member with a new baby (but explain the situation to them and let them know that if they would like to toss the binkies after we leave that is fine with me).

Gift it to the Binky Fairy/Santa/Tooth Fairy

If you are a family that believes in Santa Clause, you may want to tell them that if they give the binky to Santa, they will get a big boy/girl gift in return. Or, you can have them tie the pacifiers to balloons and release them into the air for the Binky Fairy. Or, you could let them know that binkies are not good for growing teeth, and have them leave the binky under their pillow for the tooth fairy.

Pacifier Fairy Book

I have heard some good things about “The Paci Fairy” book, but there are a few others you could check out (“Goodbye Binky”, “Florrie the Paci Fairy”). These stories help your little one to feel involved in the story, and release their binkies voluntarily.

Build a Bear

This idea is one of my favorites – take your little one to Build a Bear Workshop and have them stuff their pacifier in the bear’s tummy, before it is stitched up (this way it is with them, but not in their mouth).

Cold Turkey

If you have tried the above methods and none of them work, you could always go cold turkey. I don’t like this method, because it can cause lots of tears and toddler meltdowns; but eventually they will need to learn to let go and some children do better with a “ripping off the band aid” approach.

Hope these ideas helped!

XOXO

Charlotte

How to Fix Your Newborn’s Sleep Schedule

Sleepy parents of newborns all tend to have the same question: How do I get my newborn to sleep at night? Studies show that newborns, on average, sleep 15-17 hours in a 24-hour period, but it can be frustrating when all of their hours spent asleep seem to be when you want to go to bed!

So, how do you get your little one to sleep at night? The key is to keep them awake during a larger portion of the day. Here are a few tricks that work to keep your little ones asleep at night:

Rule Out GERD

get+baby+to+sleep.jpg

Some babies have GERD, which means that after they eat their stomach acid comes up their esophagus and wakes them up. These babies do best by going on medication for GERD and by sleeping on an incline (a rock and play worked best for our family).

Give them a Bath

Baths help little ones to relax and wind down before they fall asleep for the night. They also tend to tire newborns out, so they do not have the energy to fuss at night. As your newborn grows older, they are an important part of the bedtime routine.

Don’t Bundle Them Up

Because newborns are so tiny and do not have a large amount of fat reserves, new parents bundle them up. The more bundled up they are, the more likely they are to be sleepy. Strip of a few of the layers and see if this helps your little one be more alert during the day (of course, monitor them to make sure they are not too cold).

Strip Them Down and Bring Them Outside

Babies have a circadian rhythm (which is the scientific term for the natural internal clock in the brain which instructs humans as to when they are sleepy and when they are not). This internal clock is influenced by habit, as well as by light and darkness. When there is light outside, it signals the brain to be awake and alert, and when it is dark, it signals the brain to create melatonin. To influence your little one’s circadian rhythm, wake them up at the time you designate as their morning, strip them down and bring them outside to expose them to light. This will help the hypothalamus in the brain to recognize that it is daytime, and will influence their circadian rhythm schedule.

Turn the Lights Up

Just because you have a newborn, does not mean you have to live in a cave. Turn the lights on, open the curtains, and (hopefully) watch your little on wake up a bit more during the day.

how+to+get+your+baby+to+sleep.jpg

Tickle Them

Tickling your newborn’s feet and sides can help to keep them awake during the day. They may squirm a little bit and fuss, but sometimes it’s better to trade a slightly squirmy/fussy baby during the day for a sleepy baby at night.

I hope the above tips help you get your newborn on a regular sleeptime schedule. Comment and let me know if you have any questions, ideas, or if any of these tips worked for you!

XOXO

Charlotte

Ritz Cracker Chicken

This is one of my favorite recipes because it is quick, easy, and delicious (three of my favorite things, when it comes to cooking). The Ritz Crackers have nice crunch to them, and the garlic salt gives it a really nice flavor that makes you want to keep taking more and more bits until you look at your plate and realize it's all gone. :)

Ingredients:

p1.png
  • 2 Eggs

  • 1/2 Cup butter

  • Ritz Crackers (one sleeve)

  • 1/2 teaspoon garlic salt

  • 1/4 teaspoon freshly ground black pepper

  • 1 teaspoon Italian seasoning

  • 4 boneless, skinless chicken breasts

Directions:

Preheat oven to 375°F. Crack eggs into a bowl and scramble them. Crush the Ritz Crackers into crumbs.   Mix the garlic salt, pepper and Italian seasoning into the cracker crumbs. Pat dry the chicken breasts and lightly pound the chicken to ½ inch thickness, so that it cooks evenly. Dip them into the eggs and then into the seasoned crumb mixture to coat the chicken.

Arrange chicken into a baking dish and cut up butter and place around each breast.

Bake for 25-35 minutes or until the breadcrumbs are browned and the chicken is fully cooked.

Enjoy!

XOXO

Charlotte